Architect of the digital age
Email Forwarding Using Native AWS Services
17 November 2016
There are several ways to create an email forwarder using AWS. A few include:
-
Standing up an EC2 instance and doing it the old fashioned way.
-
Configuring your domain in Simple Email Service (SES), setting up a lambda function to forward the email, and creating a SES rule to launch the function.
-
Setting up Directory Service, configuring your domain in WorkMail, creating a user and email address, logging in as that user, and configuring forwarding.
The third step is most similar to how you might go about this with Exchange, so I’ll detail the steps to accomplish it. Setting up Directory Service is out of scope for this article, but it’s not difficult. I’m using an existing Simple AD for this example.
-
Open WorkMail in the console and configure an Organization. If you choose Quick Setup, a new Directory Service will be setup for you. Custom Setup will let you choose an existing Directory Service (or your on-prem AD via AD Connector).
-
Enter the Organization and Create or Enable a User. This allows you to set their email address. This would be the address whose mail you want to forward somewhere.
-
Click Organization Settings to get your Web Application URL. Go to it and login as the user.
-
Click the Settings gear in the top right.
-
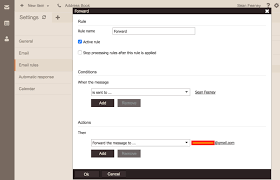
Click Email Rules, and click New.
- Leave it as an Active Rule
- Add a single Condition “When the message is sent to …“ and select your user.
- Add a single Action “Then Forward the message to …” and enter the email address you want mail forwarded to (an external address is fine).
Sample WorkMail Forwarding Rule
Viola. Note that the forwarded email comes from this user instead of its actual source. It will include the original header info in the body of the email along with “Auto forwarded by a rule.” So this may not be ideal for all use cases.
- Student Loan Bill Tracker
- The Anomaly Response Network
- The Mars Society
- Coca-Cola Scholars Foundation
- TechStars
- Leukemia & Lymphoma Society
- Cystic Fibrosis Foundation
- PRISM
- Free Bikes 4 Kidz
- Cincinnati Works
- Cincinnati Youth Collaborative
Reading:


Social